 Loading... Please wait...
Categories
Popular Brands
Our Newsletter
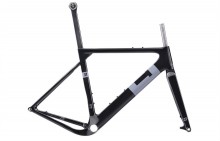
3T Exploro LTD Frameset
Product Description
EXPLORO LTD FRAMESET SPECIFICATIONS
- Bottom Bracket Type BB386 Evo
- Frame Material High Modulus Carbon Monocoque
- Fork 3T Carbon, 1 1/8" - 1 1/2"
- Headset 1 1/8" - 1 1/2" Integrated
- Seatpost 3T Exploro Carbon
- Front Derailleur Type Braze-On Required
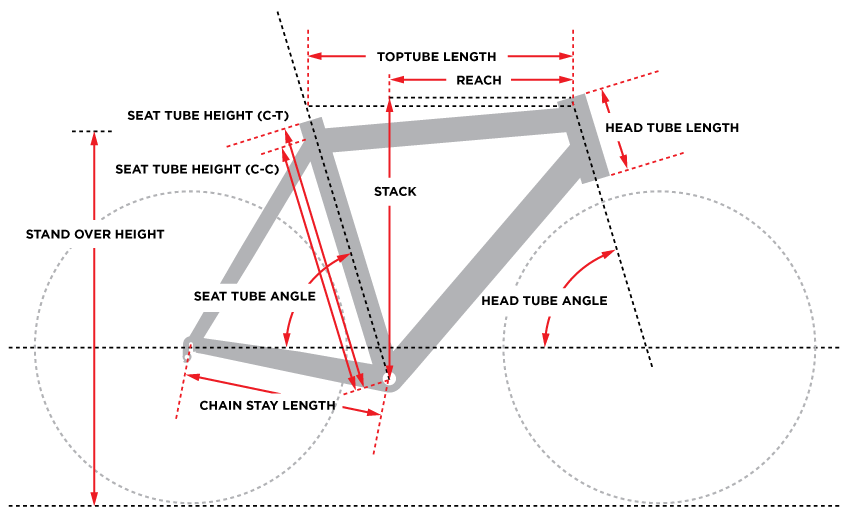
EXPLORO LTD FRAMESET GEOMETRY / SIZE CHART

| Size | Seat Tube (c-c) | Seat Tube (c-t) | Top Tube Length | Head Tube Length | Chain Stay Length | Seat Tube Angle | Head Tube Angle | Stand Over Height | Wheel Size | Stack | Reach | Reach |
|---|---|---|---|---|---|---|---|---|---|---|---|---|
| S | - | 462.8 | 529.2 | 100.6 | 415 | 72.5 | 69.5 | - | 700c | 517.5 | 366 | 366 |
EXPLORO LTD FRAMESET INFORMATION
Aero gravel bike. Really. The 3T Exploro LTD is from freethinkers for freethinkers. The bike is a road bike and an off-road bike and an in-between bike. Even cyclocross. It can go anywhere and do anything. And the Exploro does it all faster.
Aero is a great place to start. The bike comes from the mind of Gerard Vroomen, the brain behind the bikes that put Cervélo on the map. He’s always been a fan of aero, because as long as you’re moving, the wind is always on. The longer you ride, the more aero can add up. The aero downtube is the centerpiece of the aero equation. It is 50mm wide and squared off in back. They call it Sqaero, for square and aero. It keeps the airflow steady off the wide tires as the air transitions from the tires to the frame, and protects the water bottles and effectively hides the 25mm wide Sqaero seat tube from the wind as well. The Sqaero shape is also applied to the head tube, seat stays and seatpost. The result is a savings of seven watts at 20mph, 24 watts at 30mph. And this is practical aero, as it includes water bottles in the numbers. For a contrast, know that the Exploro set up with 700x40mm knobbies and two water bottles is faster than a round-tubed bike with 700x28mm slicks and no bottles. They even tested the bike covered in mud, and the aerodynamics were still excellent. Because they’re so fixated on aero, they have set up three holes for the downtube water bottle mount. Use the lower two if you’re running a single bottle, the upper two if you’re mounting a second bottle on the seat tube. Don’t worry about weighing the bike down with a second bottle. The frame is a svelte 950g.
While the bike can only take 700c tires up to 40mm in width, it also can take 27.5x 2.1” tires. And wheels. They built the frame around what is now being called the GravelPlus standard. This means that 700c and 650b wheels will fit. You can swap wheels depending on what you’re about to ride or choose one and stick with them. 650b is great when you’ve got to contend with lots of dirt and gravel and rough, rough terrain, while the 700c option is gentler stuff.
As you can imagine, this is a great place for the applications of front and rear thru-axles. The Luteus II LTD fork comes with a 15mm thru-axle and the rear is set for a 142x12mm thru-axle. Keeping with the theme of re-thinking everything, the rear derailleur hanger attaches to the thru-axle, not the frame. They call it Hang Loose. When you unscrew the thru-axle, the hanger drops off. Stronger, simpler, they even include a spare hanger with the frame. When you’re re-installing the wheel, you line up the rotor in the brake, slide in the axle, install the hanger. Tighten. go.
Brakes are post-mounts with the ability to run rotors up to 180mm in front, 160mm in back. The front hose mounts externally for fork strength, but it is clever mounting as it creates a gentle bend from your lever to the caliper. the rear hose runs internally from behind the stem. It enters the frame at the Flip Top cable guide, which has covers to accommodate single-ring shifting as well as double-ring, and both Di2 and eTap.
Those are some of the cool design features, but it’s the ride that matters. They thought of geometry and sizing in road bike terms. For the most part, what you ride for a standard road bike should be your size here, just base it on the stack and reach measurements. The seat angle is 72.5-degrees and the seatpost has zero setback. This is a “neutral” position, as it’s where you put your saddle that matters. The seatstays are a tight 415mm, which keeps the rear wheel tucked underneath for excellent stiffness and acceleration (they’re able to fit road cranks and fat tires thanks to the dropped right stay). The bottom bracket drop is 70mm for stability. The front end has a more relaxed angle than is typical for road bikes and is married to a 50mm rake. They kept the trail in check and increased the front-center to minimize toe-clip overlap and improve low-speed stability. In terms of comfort, while the downtube is huge, the bb juncture massive, and the fork legs sturdy, the ride is pretty comfy. That’s thanks to the large tires, thin seat stays, and truncated seatpost, which also features an elastomer ring around the clamp to damp high-frequency vibrations.
Here’s something to think about with wheel and tire choices. This bike was designed to ride like a road bike when you have 650b wheels with 2.1” tires installed. Take a second look at the geometry. The 415mm stays are short for a road bike. The stack and reach numbers mimic road bikes. You can get a road-like ride in terms of stiffness and agility even with fat tires installed. 650b gets more attractive for it.
And when you’re setting up the bike to ride, you have maximum flexibility. The front derailleur hanger is removable for single-ring setups. The bottom bracket standard is BB386EVO, so that just about everything can fit. Thanks to the dropped chainstay, you can fit an inner ring of a maximum 36T, a single offset ring up to 46t, and a double outer ring up to 50T. The upper steerer tube is a standard 1 1/8”, but the head tube is tapered with a 1.5”. Headset bearings come with the frameset. The seatpost clamp is the same you’ll find on 3T DiffLoc seatposts: it comes with three sets of caps to fit 7mm round, 7x9mm oval, and 7x10mm oval rails. There are top tube bosses starting at 100mm from the head tube. these can be left empty or any number of bags and bottle mounts can be fixed in place.
Also included with the frameset are a spare rear derailleur hanger, an internal seatpost clamp, a front derailleur cable liner, a front derailleur hanger and a noise-cancelling foam sleeve for the rear derailleur housing and brake hose.
The bike comes with guide lines installed for the cable runs. don’t remove these until you’re ready to install the cables. Use the lines to thread the cables, then housing through the bike. If you’re concerned about the full housing rattling, use the included foam sleeve, cut into pieces to line the inside of the frame tubes. If you’re running Shimano Di2, you can pull the fork and drop the battery in through the downtube opening in the head tube. Let the battery go to the bottom of the downtube before reinstalling the fork.
Find Similar Products by Category
Customers Who Viewed This Product Also Viewed
-
$1,759.45

-
$1,374.45

-
$1,759.45

-
$3,849.45

Add to Wish List
You Recently Viewed...
Information |
My Account |
Connect With UsSecure Payment
|
GET THE APPSentosa Bicycle App is now available on Google Play & App Store.
|


